 Parrot Cart plugins
PCE.CVPOn the TV
These are the author’s screenshots, shown pixel for pixel.
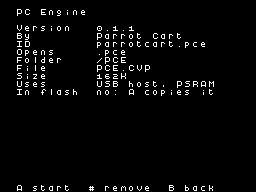
256 × 192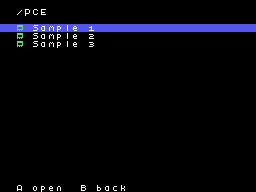
256 × 192README on the cart
This is what the cart shows for this plugin. It’s 140 lines long and 30 characters wide.
3,063 bytesPlain text
PC ENGINE

This plugin plays PC Engine
and TurboGrafx-16 HuCard games
on the ColecoVision.

SETUP

Copy PCE.CVP into the /PLUGINS
folder on the card. Put your
.pce files in /PCE, or
anywhere else on the card.
Pick one in the menu to play
it.

USB pads need a powered hub on
the cart's USB port, because
the cart can't power them. A
Switch Pro Controller, an
8BitDo pad in Switch mode, or
a plain HID pad works.

CONTROLS

On the ColecoVision
controller:

- The joystick is the D-pad.
- Left fire is II, and right
  fire is I.
- Keypad # is RUN, and keypad
  * is SELECT.
- Keypad 2 and 8 move the view
  up and down by 8 lines.
- Keypad 4 and 6 move the view
  left and right, when a wide
  picture is shown at full
  size.
- Keypad 5 puts the view back
  in the middle.
- Keypad 1 switches a wide
  picture between squeezed to
  fit and full size.
- Keypad 3 switches between
  192 lines at full size and
  all the lines squeezed to
  fit.
- Keypad 0 switches between
  smooth scrolling and
  scrolling by tiles.
- Keypad 7 turns rapid fire on
  I on and off. Keypad 9 does
  the same for II.
- Press RESET on the console
  to go back to the menu.

On a USB pad:

- The D-pad or the left stick
  is the D-pad.
- The right face button is I,
  and the bottom one is II.
- The top face button is rapid
  I, and the left one is rapid
  II.
- Plus is RUN, and minus is
  SELECT.
- L and R move the view up and
  down.
- ZL puts the view back in the
  middle.
- ZR switches the scrolling.

The first pad plays along with
the console's controller as
player 1. A second pad is
player 2.

NOTES

- The TV shows 192 lines. Most
  games draw 224 or 240, so
  the view starts in the
  middle. Use keypad 2, 8 and
  5 to see the rest, or keypad
  3 to squeeze every line in.
- Some games are wider than
  the TV's 256 columns. They
  start squeezed to fit.
  Keypad 1 shows them at full
  size, and 4 and 6 move the
  view.
- Smooth scrolling moves the
  way the game does. Scrolling
  by tiles moves 8 pixels at a
  time, but the picture
  updates more often. Try it
  when a busy screen looks
  slow.
- The TV shows 15 colors, two
  in each 8-pixel row. Busy
  screens lose some color.
- The sound plays the three
  loudest of the game's six
  channels, plus noise.
  Sampled sound, such as
  voices and some drums,
  doesn't play.
- Games that save to backup
  memory work. The save is a
  .sav file next to the game.
- Headered dumps, US dumps and
  Street Fighter II' work.
- CD-ROM and SuperGrafx games
  don't work. There are no
  save states.

CREDITS

- PCE-GO by Alex Duchesne,
  from retro-go, under the
  GPL-2.0. It comes from
  HuExpress, Hu-Go! and Bero's
  PCE emulator.
- This copy of PCE-GO is from
  pico-pcePlus, under the
  GPL-3.0. The source is at
  https://github.com/PicoPlus-
  devel/pico-pcePlus
- TinyUSB by Ha Thach, under
  the MIT license. The source
  is at
  https://github.com/hathach/t
  inyusb
- The plugin itself is by
  Parrot Cart, under the
  GPL-3.0. Its source, with
  the changes made to PCE-GO,
  is linked next to its
  download.
README
This is the README.md from release v0.1.1. Images show up as links.
PC Engine
This plugin plays PC Engine and TurboGrafx-16 HuCard games on the ColecoVision.
Setup
Copy PCE.CVP into the /PLUGINS folder on the card. Put your .pce files in /PCE, or anywhere else on the card. Pick one in the menu to play it.
USB pads need a powered hub on the cart’s USB port, because the cart can’t power them. A Switch Pro Controller, an 8BitDo pad in Switch mode, or a plain HID pad works.
Controls
On the ColecoVision controller:
- The joystick is the D-pad.
- Left fire is II, and right fire is I.
- Keypad # is RUN, and keypad * is SELECT.
- Keypad 2 and 8 move the view up and down by 8 lines.
- Keypad 4 and 6 move the view left and right, when a wide picture is shown at full size.
- Keypad 5 puts the view back in the middle.
- Keypad 1 switches a wide picture between squeezed to fit and full size.
- Keypad 3 switches between 192 lines at full size and all the lines squeezed to fit.
- Keypad 0 switches between smooth scrolling and scrolling by tiles.
- Keypad 7 turns rapid fire on I on and off. Keypad 9 does the same for II.
- Press RESET on the console to go back to the menu.
On a USB pad:
- The D-pad or the left stick is the D-pad.
- The right face button is I, and the bottom one is II.
- The top face button is rapid I, and the left one is rapid II.
- Plus is RUN, and minus is SELECT.
- L and R move the view up and down.
- ZL puts the view back in the middle.
- ZR switches the scrolling.
The first pad plays along with the console’s controller as player 1. A second pad is player 2.
Notes
- The TV shows 192 lines. Most games draw 224 or 240, so the view starts in the middle. Use keypad 2, 8 and 5 to see the rest, or keypad 3 to squeeze every line in.
- Some games are wider than the TV’s 256 columns. They start squeezed to fit. Keypad 1 shows them at full size, and 4 and 6 move the view.
- Smooth scrolling moves the way the game does. Scrolling by tiles moves 8 pixels at a time, but the picture updates more often. Try it when a busy screen looks slow.
- The TV shows 15 colors, two in each 8-pixel row. Busy screens lose some color.
- The sound plays the three loudest of the game’s six channels, plus noise. Sampled sound, such as voices and some drums, doesn’t play.
- Games that save to backup memory work. The save is a
.savfile next to the game. - Headered dumps, US dumps and Street Fighter II’ work.
- CD-ROM and SuperGrafx games don’t work. There are no save states.
Credits
- PCE-GO by Alex Duchesne, from retro-go, under the GPL-2.0. It comes from HuExpress, Hu-Go! and Bero’s PCE emulator.
- This copy of PCE-GO is from pico-pcePlus, under the GPL-3.0. The source is at https://github.com/PicoPlus-devel/pico-pcePlus
- TinyUSB by Ha Thach, under the MIT license. The source is at https://github.com/hathach/tinyusb
- The plugin itself is by Parrot Cart, under the GPL-3.0. Its source, with the changes made to PCE-GO, is linked next to its download.
Build it yourself
You need the Raspberry Pi Pico SDK 2.1.1, an Arm GNU toolchain, CMake, Ninja, Python 3, sjasmplus and picotool. Releases are built with the Arm GNU Toolchain 9-2019-q4 (GCC 9.2.1) and picotool 2.3.1. With those you get the same file, byte for byte.
cmake -B build -G Ninja -DPICO_SDK_PATH=$HOME/pico-sdk
ninja -C build
This makes build/PCE.CVP. Copy it into the /PLUGINS folder on the card.
On Ubuntu, tools/ci/setup.sh installs the same tools that GitHub uses to
build each release.
CART-README.md is the text the cart shows on the plugin’s page. It is
the start of this README.
License
The plugin is under the GNU GPL, version 3 (LICENSE). THIRD-PARTY.md
lists the parts that came from elsewhere, and their licenses.
Release details
We read these from GitHub when the plugin was listed.
- Release
v0.1.1, 2026-11-18- Image
- 161,792 bytes, loaded into RAM
- Plugin API
1- Source
- Code at
v0.1.1 - Credits
- PCE-GO by Alex Duchesne, from retro-go, under the GPL-2.0. It comes from HuExpress, Hu-Go! and Bero’s PCE emulator.; This copy of PCE-GO is from pico-pcePlus, under the GPL-3.0. The source is at; TinyUSB by Ha Thach, under the MIT license. The source is at; The plugin itself is by Parrot Cart, unde…
- SHA-256
- 3e010b04fa1252268e43a6da51e7f08047ea192e683d9ed4fc771204fe31d81e
The code
Every plugin here has a public repo on GitHub, so you can read how it works.
Release notes
The newest version is first.
0.1.1
2026-11-18,
v0.1.1First release.
Put it on your cart
Download PCE.CVP
The SHA-256 is above if you want to check the file.
Copy it to /PLUGINS
That folder is on the cart’s microSD card.
Put your files in /PCE
Your .pce files go in this folder.
Start it
Pick one of your files on the SD card and press A.